
LPX939 is a compact device for signal processing and control. It delivers low-latency I/O, deterministic timing, and a modest power draw. The guide explains what LPX939 does, which features matter, and which tasks suit it. The article uses clear steps and short definitions. It stays focused on practical details. It avoids jargon and gives precise guidance for deployment and upkeep.
Table of Contents
ToggleKey Takeaways
- LPX939 is a compact edge controller delivering low-latency I/O and deterministic timing ideal for machine monitoring and small automation.
- It features a quad-core microcontroller, dual Ethernet ports, 24-bit ADC, 12-bit DAC, and boots quickly with lightweight firmware.
- Installation is straightforward with DIN rail mounting, screw terminals, and support for Modbus TCP, MQTT, and HTTP protocols.
- Setup involves simple steps including power connection, sensor wiring, and configuration via a web UI with secure password changes.
- LPX939 supports remote diagnostics, firmware updates, and uses circular buffering to handle network outages without data loss.
- Common issues like boot failure or network drops can be resolved with basic troubleshooting such as fuse replacement or shielded cabling.
What Is LPX939? Key Features And Specifications
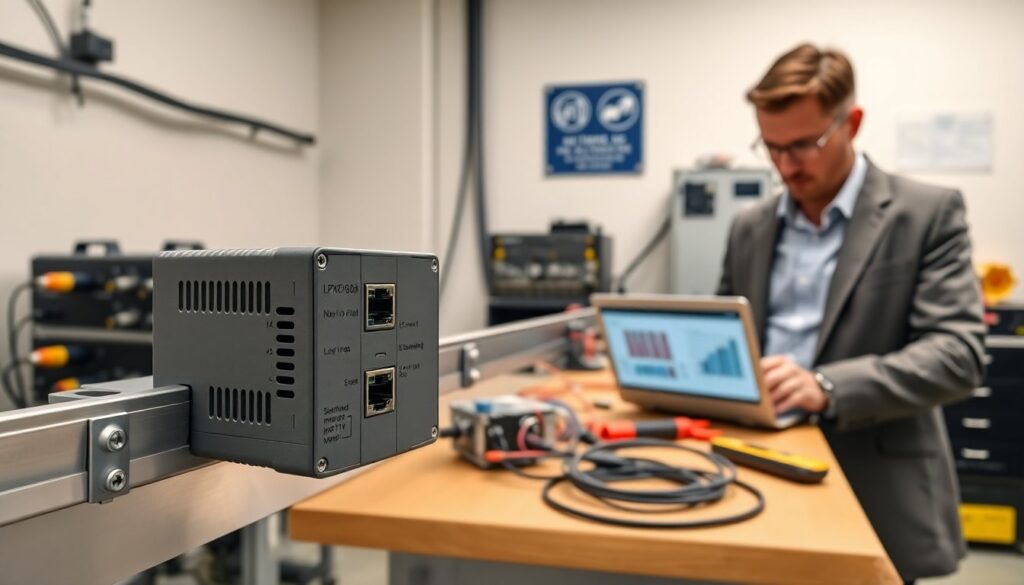
LPX939 is a dedicated edge controller that handles digital and analog signals. It includes a quad-core microcontroller, dual Ethernet ports, and an integrated real-time clock. The device supports 24-bit ADC inputs and 12-bit DAC outputs. LPX939 runs a lightweight firmware that boots in under two seconds. It offers 256 MB of RAM and 8 GB of flash storage for local logging. The enclosure meets IP54 for dust and splash resistance. It accepts 9–36 V DC and draws under 4 W in normal operation. Engineers choose LPX939 for predictable timing, small footprint, and straightforward I/O mapping.
Common Applications And Use Cases
LPX939 fits machine monitoring, small automation cells, and remote sensing sites. It records sensor data, performs basic control loops, and relays alerts to cloud services. Technicians use LPX939 to log vibration, temperature, and pressure signals at high sample rates. It runs local scripts for alarm thresholds and executes failsafe outputs on fault. Developers embed LPX939 in mobile test rigs and lab benches where compact size matters. It serves as a protocol gateway between Modbus devices and modern APIs. Companies deploy LPX939 when they need low latency, modest compute, and long-term unattended operation.
Installation, Setup, And Compatibility Overview
LPX939 mounts on a DIN rail or a small plate. It connects to sensors via screw terminals and to networks via RJ45. The device ships with a USB setup cable and a basic web UI. It supports standard protocols such as Modbus TCP, MQTT, and HTTP. LPX939 accepts firmware updates over the network and via USB. Integrators verify pinouts and shielded cabling for high-noise environments. The vendor publishes a compatibility list for sensors and I/O boards. Users should test a sample unit before large rollouts to confirm fit and behavior.
Hardware And Software Requirements
LPX939 needs a power source rated 9–36 V DC and a clean ground reference. It requires shielded sensor cables for analog inputs above 10 meters. The host computer needs a modern browser for the web UI and a USB port for initial setup. The vendor provides a command-line tool for scripted deployments. LPX939 supports TLS for secure connections: administrators must provision certificates. For heavy logging, users should attach external storage via the microSD slot. The spec sheet lists maximum input voltages and isolation requirements. Field teams should bring a multimeter and spare fuses during installation.
Step-By-Step Setup Checklist
- Unpack LPX939 and inspect for shipping damage.
- Mount the device on a DIN rail or plate.
- Connect power and confirm LED indicators light.
- Attach sensor and actuator wires to labeled terminals.
- Connect Ethernet and plug the USB setup cable to a laptop.
- Open the web UI in a browser and log in with the default password.
- Change the default password and configure network settings.
- Calibrate analog inputs following the vendor guide.
- Load any required scripts or control blocks.
- Run a local test and verify I/O, then enable remote logging.
Each step helps ensure LPX939 works reliably in the field.
Performance, Troubleshooting, And Maintenance
LPX939 delivers millisecond-class response for I/O events under typical loads. It handles burst logging up to several thousand samples per second across multiple channels. The device uses a circular buffer to avoid data loss during short network outages. Administrators monitor CPU, memory, and I/O counters via the web UI. They schedule firmware updates during maintenance windows to avoid interruptions. LPX939 supports remote diagnostics through secure shells and logs. Regular inspections of connectors and power supply reduce unexpected failures. Follow simple maintenance steps to keep LPX939 stable over years of service.
Common Issues And Quick Fixes
Issue: Device does not boot. Fix: Measure input voltage and swap the fuse. If power is present, use the USB console to read boot messages. Issue: Network drops. Fix: Replace the Ethernet cable with a shielded one and test another switch port. Issue: Noisy analog readings. Fix: Shorten unshielded leads, add ground reference, and enable input filtering in the UI. Issue: Firmware update fails. Fix: Reboot LPX939, retry update over USB, and keep power stable during the process. Issue: Slow response. Fix: Check CPU load and reduce nonessential logging. For persistent faults, collect logs and open a support ticket with device serial and recent logs.